Adriano Zumbo's Candy Cane Macarons

Adriano Zumbo, "Every Christmas, the one lolly that's left in the house is candy canes. I was thinking about how to make them more interesting to eat, so I caramelised them and make them into ganache, and then the ganache became the filling for these macarons."

Adriano Zumbo's Candy Cane Macarons

Adriano Zumbo's Candy Cane Macarons Recipe

Makes about 15 (8cm-long) or 2 (24cm-long) (Adapted from Gourmet Magazine)


Ingredients

  • 150 g almond meal
  • 150 g pure icing sugar, sieved
  • 150 g caster sugar
  • 110 g eggwhite (about 3 eggwhites)
  • 1/4 tsp red food powder colouring, or to taste

Candy Cane Ganache:

  • 125 g white chocolate, finely chopped
  • 20 g coarsely chopped crushed candy canes (about 2 small)
  • 75 ml pouring cream
  • 1/2 tsp peppermint essence
  • 45 g butter, coarsely chopped

Method

  1. Preheat oven to 140C. Sieve almond meal and icing sugar into a large bowl, set aside. Combine caster sugar and 40 ml water in a saucepan, stir over medium-high heat until sugar dissolved, then bring to the boil and cook until mixture reaches 121C on a sugar thermometer (4-5 minutes). Meanwhile, whisk half the eggwhite in an electric mixer on medium speed, then, whisking continuously, gradually add syrup in two places to avoid syrup pooling in bottom of mixing bowl. Whisk until lukewarm (3-4 minutes), then add to almond meal mixture. Add remaining eggwhite and fold to combine.
  2. Divide mixture between two bowls and add red food colouring to one bowl, folding to combine and colouring to your liking. Slap excess air of white mixture with a spatula. Lay a piping bag fitted with a 1 cm plain nozzle on its side, fill one side with white mixture and the other side with red mixture. Pipe half the mixture into 15 x 8cm-long or 2 x 24 cm-long right-facing candy cane shapes on baking trays lined with baking paper.
  3. Pipe remaining mixture into 15 x 8cm-long or 2 x 24cm-long left-facing candy cane shapes, firmly tap trays on work bench to expel excess air, then stand until a skin forms and mixture doesn't stick on your finger when touched (45 minutes - 1 hour). Bake in batches until firm and tops are set (10-12 minutes for smaller ones, 14-16 minutes for larger ones), then cool on trays.
  4. Meanwhile, for candy cane ganache, place chocolate in a heatproof bowl, set aside. Cook candy canes without stirring in a small frying pan over medium-high heat until caramelised (4-5 minutes). Meanwhile, warm cream in a small saucepan over medium heat, add to candy canes, shake pan until combined (10-15 minutes). Add to chocolate with peppermint essence, stir to combine, then stir in butter. Stand until ganache reaches spreadable consistency (1-1 1/4 hours), spoon into a piping bag fitted with a 9mm plain nozzle and pipe on flat sides of right-facing candy cane macarons and stand until set (10-15 minutes). Candy cane macarons will keep in airtight container for up to 2 days but are best eaten on day of making.

Labels: , , , , ,

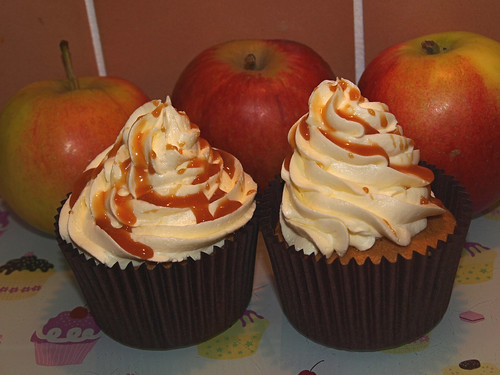
Toffee-Apple Cupcakes

Toffee-Apple Cupcakes

Toffee-Apple Cupcakes Recipe


Ingredients

  • 60 g butter, softened
  • 1 cup (150 g) self-raising flour
  • 1 tsp ground cinnamon
  • 1/2 cup (110 g) caster sugar
  • 1/4 (60 ml) maple-flavoured syrup
  • 2 eggs
  • 1/2 cup (85 g) coarsely grated apple

Maple Frosting:

  • 90g butter, softened
  • 1 cup (160 g) icing sugar
  • 2 tsp maple flavoured syrup

Toffee:

  • 1 cup (220 g) caster sugar
  • 1/2 cup (125 ml) water
  • 12 pink marshmallows for decorations

Method

  1. Preheat oven to moderate (180C).
  2. Beat butter, flour, cinnamon, sugar syrup and eggs in small bowl with electric mixer on low speed until ingredients are combined. Increase speed to medium, beat until mixture is changed to a paler colour.
  3. Stir in nuts (if using) and grated apple. Divide mixture among cases; smooth surface.
  4. Bake cakes about 25 minutes.
  5. Turn cakes onto wire rack to cool.
  6. To Make Maple Frosting: Beat butter, sifted icing sugar and syrup in small bowl with electric mixer until light and fluffy.
  7. To Make Toffee: Combine sugar with the water in small heavy-based saucepan. Stir over heat, without boiling, until sugar dissolves; bring to the boil. Reduce heat, simmer uncovered, without stirring, until mixture is golden brown. Remove from heat; stand until bubbles subside. Drizzle toffee from wooden spoon onto a rolling pin, covered with baking paper. Allow toffee to set at room temperature. Slide baking paper off rolling pin to remove toffee shapes. Immediately position on cake.
  8. Spread cakes with frosting; top with marshmallows, decorate with toffee arches.

Labels: , , , ,

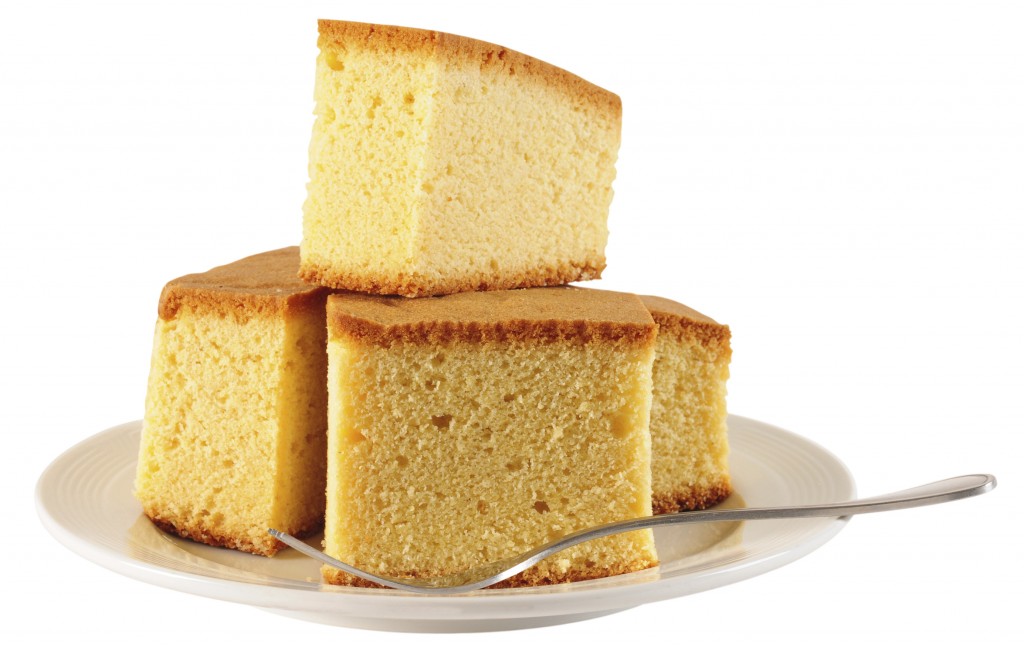
Honey Castella / Kasutera Cake (Japanese Sponge Cake)

The Sweet Spot, "Castella, also known as kasutera, is a delicate sponge cake that's popular in Japan, particularly in the city of Nagasaki, where it's served at festivals and street markets. Although the exact origins of castella are unknown, it's thought to have originated in the Castile region of Spain and to have been brought to Japan by Portuguese merchants in the sixteenth century. The basic recipe has many variations, but the honeyed version with dark caramelized crusts is among the most beloved in Japan. It's my favourite too."

Honey Castella / Kasutera Cake (Japanese Sponge Cake)

If you think Imelda Marcos had an impressive collection of shoes, the selection of cookbooks possessed by Trissa would have made your jaw dropped. When I visited her home two weeks ago, she handed me this cookbook - "The Sweet Spot" by Pichet Ong and Genevieve Ko and said to me, "I think you will like this one."

I flipped through it and 2 recipes immediately caught my eyes - "Condensed Milk Pound Cake" and "Honey Castella Cake". She saw my excitement and told me to take it home to try out the recipes.

I first heard of this castella cake from The Kitchen Snippets and ever since then I was eager to find out the texture and taste of this popular cake. It truly didn't disappoint. While the cake was baking in the oven, our house was fill with the sweet smell of honey. The texture of this cake is cotton soft and it's truly one of the best pound cake I have tasted.

I wouldn't say this is the best castella cake recipe because I have seen a better one. As I was baking this cake last night, Ju from The Little Teochew posted her Castella Cake which was her 5th attempt in perfecting this cake. You just have to look at her pictures to appreciate the beauty (and her cake slicing skill!) of this castella cake.

Honey Castella Cake Recipe

(Adapted from The Sweet Spot) - Makes one 9 x 13-inch cake, about 24 servings


Ingredients

  • 1/4 cup (1 7/8 ounces / 52 g) canola, vegetable, or other neutral oil, plus more for greasing the pan
  • 1 1/2 cups (7 3/8 ounces / 210 g) all-purpose flour
  • 1/2 tsp salt
  • 7 large eggs
  • 3 large egg yolks
  • 1 1/2 cups (10 1/2 ounces / 300 g) sugar
  • 1/4 cup (3 1/2 ounces / 100 g) honey

Method

  1. Preheat the oven to 350F. Generously grease a 9 x 13-inch cake pan and set aside.
  2. Sift together the flour and salt and set aside.
  3. Put the eggs, yolks, sugar, and honey in the bowl of an electric mixer and set over a saucepan of simmering water. Whisk constantly until the sugar is completely dissolved and the mixture is warm to the touch, 10 about minutes.
  4. Fit the bowl into the mixer and whisk at medium-high speed until the mixture is pale yellow, thick, and completely cool, about 10 minutes. Gently fold in the dry ingredients.
  5. In a small bowl, whisk together 1 cup of the batter with the oil until smooth and homogeneous. Add the oil mixture into the remaining batter in a slow, steady stream, folding continuously.
  6. Transfer to the prepared cake pan. Bake for 15 minutes, then turn the heat down to 300F and bake until a tester inserted in the center comes out clean, about 45 more minutes. Cool completely in the pan on a rack.

Labels: , , , , ,

Chocolate Bacon "NOT Gingerbread" Cake House

Technically, this is not a Gingerbread House. It's a rustic looking ski lodge for Santa that is made from chocolate bacon cake with chocolate and maple frosting. It has a bacon thatch roof and the main door is made of pepperoni salami.

This crazy idea has been buzzing in my head after reading about the DON's competition from Nuffnang. It's inspired from the Chocolate Bacon Cupcakes recipe by Helen (Grab Your Fork) and Bacon Baskets recipe by Suze (Chocolatesuze).

Christmas Recipe - Chocolate Bacon
Christmas Recipe - Chocolate Bacon "NOT Gingerbread" Cake House

Let me guide you through the constructions of this fun house:

Method

  1. Bake a chocolate-bacon cake using a 18.5 x 11.5 cm loaf pan. I use the chocolate bacon cupcakes recipe from Grab Your Fork. Adjust the baking time to 40 minutes. Let it cool completely.
  2. Make the maple frosting (Recipe available from HERE) and chocolate frosting (recipe available HERE).
  3. Make the bacon thatch roof. Trim off all rind and fats from the bacon slices (this will prevent shrinkage and will give the roof a nice flat square shape). Cut the bacon into long thin strip (10 cm in length) and weave into a 9 x 9 cm square.
  4. Place the bacon on a sheet of paper towel and cover it with another paper towel. Microwave it for 2-3 minutes or until the bacon is brown and crisp. Make 2.
  5. Cut the cake loaf into two equal size pieces and trim each piece to a 9 x 9 cm square. Further trim one of the squares to a triangle. Spread a layer of chocolate frosting on the top of the square piece of cake and stack the triangle piece on top.
  6. Spread chocolate frosting on all surfaces and attach the bacon roof.
  7. DON's pepperoni salami has the perfect shape and texture to make the rustic main door.
  8. Cut the salami as follow to make a 5 cm tall door.
  9. Attach the salami door to the wall that is covered with chocolate frosting. Pipe a small dot of maple frosting and attach a silver cachous as the door knot. Attach a colourful chocolate candy on top of the salami door to reassemble the Christmas wreath.
  10. I use chocolate coated liquorice to give this house a winter log cabin feel.
  11. Attached the chocolate coated liquorice on all walls that has already been covered with chocolate frosting.
  12. Pipe the maple frosting around the roof to decorate. Add silver cachous on maple frosting for more festive feel.
  13. For the chimney, I use yogurt coated raspberry liquorice.
  14. Slice the liquorice in an angle that will make it sitting well on the roof.
  15. Pipe a little maple frosting on the sliced angle and attach it to the roof.
  16. Pipe a little more maple frosting on the chimney and decorate it with more silver cachous.
  17. Place a skiing Santa figure next to the newly completed ski lodge.

Labels: , , , , , , ,

Nuvolone - (Cloud Soufflé)

Souffle for breakfast? Yup, you bet! But don't be surprised how easy it is to whip up this impressive and yet delicious dish.

Nuvolone - (Cloud Soufflé)

I was attracted to the picture of this souffle on the cover of the 'Winter In The Alps' Cookbook. I knew I just had to make this for breakfast as soon as I brought home this book.

Winter In The Alps - "This is similar to a traditional souffle, but the eggs remain separated. It is the simplest dish to make and looks very impressive. I've called it Nuvolone, which literally translates as 'big cloud', because when it comes out of the oven it looks like a big cumulus in a sunset."

Nuvolone (Cloud Souffle) Recipe (Serve 1)

(Adapted from Winter In The Alps Cookbook by Manuela Darling-Gansser)


Ingredients

  • 2 eggs, separated
  • Sea salt
  • 50 ml (2 fl oz) cream
  • 40 g (1 1 /2 oz) grated Gruyere cheese
  • Freshly ground black pepper
  • 15 g (1/2 oz) unsalted butter

Method

  1. Preheat the oven to 200C (400F). Butter an individual ramekin per person (about 15 cm / 6" in diameter). Beat the egg whites. When they start to become stiff, add salt to taste. Continue beating until they hold their peaks well.
  2. Spoon the egg whites into the ramekin. With the back of a soup spoon, make a well in the middle of the egg whites, pushing the egg whites up the sides of the ramekin. Carefully drop the 2 egg yolks into the well.
  3. Then add the cream and Gruyere. Grind over some black pepper and add the knob of butter. Smooth the egg whites back over the hole.
  4. Bake in the oven for 4 to 5 minutes. The top should be lightly golden, and when you break the crust, the yolks and cream should be soft and hot.
  5. Serve with crusty bread to dip into the yolks and cream.

Labels: , , ,