Adriano Zumbo's Candy Cane Macarons

Adriano Zumbo, "Every Christmas, the one lolly that's left in the house is candy canes. I was thinking about how to make them more interesting to eat, so I caramelised them and make them into ganache, and then the ganache became the filling for these macarons."

Adriano Zumbo's Candy Cane Macarons

Adriano Zumbo's Candy Cane Macarons Recipe

Makes about 15 (8cm-long) or 2 (24cm-long) (Adapted from Gourmet Magazine)


Ingredients

  • 150 g almond meal
  • 150 g pure icing sugar, sieved
  • 150 g caster sugar
  • 110 g eggwhite (about 3 eggwhites)
  • 1/4 tsp red food powder colouring, or to taste

Candy Cane Ganache:

  • 125 g white chocolate, finely chopped
  • 20 g coarsely chopped crushed candy canes (about 2 small)
  • 75 ml pouring cream
  • 1/2 tsp peppermint essence
  • 45 g butter, coarsely chopped

Method

  1. Preheat oven to 140C. Sieve almond meal and icing sugar into a large bowl, set aside. Combine caster sugar and 40 ml water in a saucepan, stir over medium-high heat until sugar dissolved, then bring to the boil and cook until mixture reaches 121C on a sugar thermometer (4-5 minutes). Meanwhile, whisk half the eggwhite in an electric mixer on medium speed, then, whisking continuously, gradually add syrup in two places to avoid syrup pooling in bottom of mixing bowl. Whisk until lukewarm (3-4 minutes), then add to almond meal mixture. Add remaining eggwhite and fold to combine.
  2. Divide mixture between two bowls and add red food colouring to one bowl, folding to combine and colouring to your liking. Slap excess air of white mixture with a spatula. Lay a piping bag fitted with a 1 cm plain nozzle on its side, fill one side with white mixture and the other side with red mixture. Pipe half the mixture into 15 x 8cm-long or 2 x 24 cm-long right-facing candy cane shapes on baking trays lined with baking paper.
  3. Pipe remaining mixture into 15 x 8cm-long or 2 x 24cm-long left-facing candy cane shapes, firmly tap trays on work bench to expel excess air, then stand until a skin forms and mixture doesn't stick on your finger when touched (45 minutes - 1 hour). Bake in batches until firm and tops are set (10-12 minutes for smaller ones, 14-16 minutes for larger ones), then cool on trays.
  4. Meanwhile, for candy cane ganache, place chocolate in a heatproof bowl, set aside. Cook candy canes without stirring in a small frying pan over medium-high heat until caramelised (4-5 minutes). Meanwhile, warm cream in a small saucepan over medium heat, add to candy canes, shake pan until combined (10-15 minutes). Add to chocolate with peppermint essence, stir to combine, then stir in butter. Stand until ganache reaches spreadable consistency (1-1 1/4 hours), spoon into a piping bag fitted with a 9mm plain nozzle and pipe on flat sides of right-facing candy cane macarons and stand until set (10-15 minutes). Candy cane macarons will keep in airtight container for up to 2 days but are best eaten on day of making.

Labels: , , , , ,

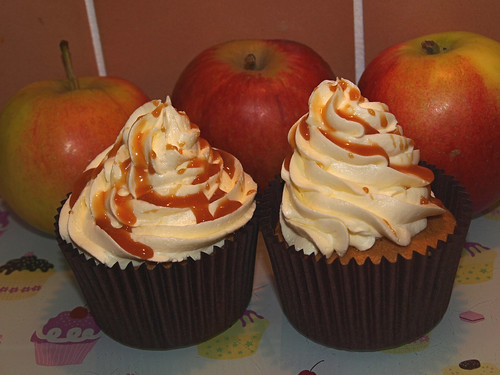
Toffee-Apple Cupcakes

Toffee-Apple Cupcakes

Toffee-Apple Cupcakes Recipe


Ingredients

  • 60 g butter, softened
  • 1 cup (150 g) self-raising flour
  • 1 tsp ground cinnamon
  • 1/2 cup (110 g) caster sugar
  • 1/4 (60 ml) maple-flavoured syrup
  • 2 eggs
  • 1/2 cup (85 g) coarsely grated apple

Maple Frosting:

  • 90g butter, softened
  • 1 cup (160 g) icing sugar
  • 2 tsp maple flavoured syrup

Toffee:

  • 1 cup (220 g) caster sugar
  • 1/2 cup (125 ml) water
  • 12 pink marshmallows for decorations

Method

  1. Preheat oven to moderate (180C).
  2. Beat butter, flour, cinnamon, sugar syrup and eggs in small bowl with electric mixer on low speed until ingredients are combined. Increase speed to medium, beat until mixture is changed to a paler colour.
  3. Stir in nuts (if using) and grated apple. Divide mixture among cases; smooth surface.
  4. Bake cakes about 25 minutes.
  5. Turn cakes onto wire rack to cool.
  6. To Make Maple Frosting: Beat butter, sifted icing sugar and syrup in small bowl with electric mixer until light and fluffy.
  7. To Make Toffee: Combine sugar with the water in small heavy-based saucepan. Stir over heat, without boiling, until sugar dissolves; bring to the boil. Reduce heat, simmer uncovered, without stirring, until mixture is golden brown. Remove from heat; stand until bubbles subside. Drizzle toffee from wooden spoon onto a rolling pin, covered with baking paper. Allow toffee to set at room temperature. Slide baking paper off rolling pin to remove toffee shapes. Immediately position on cake.
  8. Spread cakes with frosting; top with marshmallows, decorate with toffee arches.

Labels: , , , ,

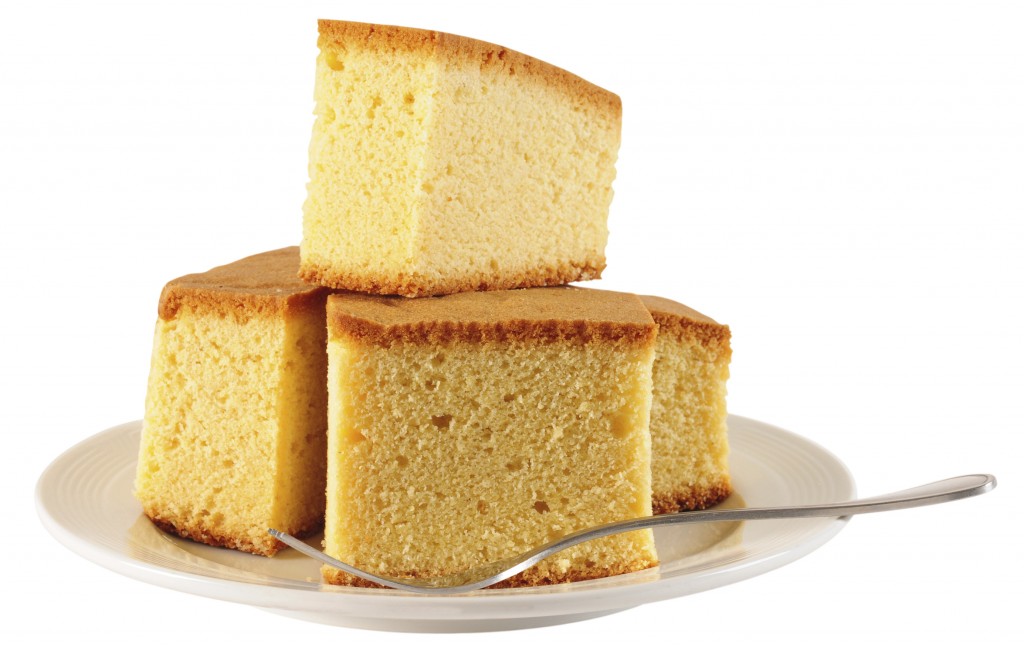
Honey Castella / Kasutera Cake (Japanese Sponge Cake)

The Sweet Spot, "Castella, also known as kasutera, is a delicate sponge cake that's popular in Japan, particularly in the city of Nagasaki, where it's served at festivals and street markets. Although the exact origins of castella are unknown, it's thought to have originated in the Castile region of Spain and to have been brought to Japan by Portuguese merchants in the sixteenth century. The basic recipe has many variations, but the honeyed version with dark caramelized crusts is among the most beloved in Japan. It's my favourite too."

Honey Castella / Kasutera Cake (Japanese Sponge Cake)

If you think Imelda Marcos had an impressive collection of shoes, the selection of cookbooks possessed by Trissa would have made your jaw dropped. When I visited her home two weeks ago, she handed me this cookbook - "The Sweet Spot" by Pichet Ong and Genevieve Ko and said to me, "I think you will like this one."

I flipped through it and 2 recipes immediately caught my eyes - "Condensed Milk Pound Cake" and "Honey Castella Cake". She saw my excitement and told me to take it home to try out the recipes.

I first heard of this castella cake from The Kitchen Snippets and ever since then I was eager to find out the texture and taste of this popular cake. It truly didn't disappoint. While the cake was baking in the oven, our house was fill with the sweet smell of honey. The texture of this cake is cotton soft and it's truly one of the best pound cake I have tasted.

I wouldn't say this is the best castella cake recipe because I have seen a better one. As I was baking this cake last night, Ju from The Little Teochew posted her Castella Cake which was her 5th attempt in perfecting this cake. You just have to look at her pictures to appreciate the beauty (and her cake slicing skill!) of this castella cake.

Honey Castella Cake Recipe

(Adapted from The Sweet Spot) - Makes one 9 x 13-inch cake, about 24 servings


Ingredients

  • 1/4 cup (1 7/8 ounces / 52 g) canola, vegetable, or other neutral oil, plus more for greasing the pan
  • 1 1/2 cups (7 3/8 ounces / 210 g) all-purpose flour
  • 1/2 tsp salt
  • 7 large eggs
  • 3 large egg yolks
  • 1 1/2 cups (10 1/2 ounces / 300 g) sugar
  • 1/4 cup (3 1/2 ounces / 100 g) honey

Method

  1. Preheat the oven to 350F. Generously grease a 9 x 13-inch cake pan and set aside.
  2. Sift together the flour and salt and set aside.
  3. Put the eggs, yolks, sugar, and honey in the bowl of an electric mixer and set over a saucepan of simmering water. Whisk constantly until the sugar is completely dissolved and the mixture is warm to the touch, 10 about minutes.
  4. Fit the bowl into the mixer and whisk at medium-high speed until the mixture is pale yellow, thick, and completely cool, about 10 minutes. Gently fold in the dry ingredients.
  5. In a small bowl, whisk together 1 cup of the batter with the oil until smooth and homogeneous. Add the oil mixture into the remaining batter in a slow, steady stream, folding continuously.
  6. Transfer to the prepared cake pan. Bake for 15 minutes, then turn the heat down to 300F and bake until a tester inserted in the center comes out clean, about 45 more minutes. Cool completely in the pan on a rack.

Labels: , , , , ,

Chocolate Bacon "NOT Gingerbread" Cake House

Technically, this is not a Gingerbread House. It's a rustic looking ski lodge for Santa that is made from chocolate bacon cake with chocolate and maple frosting. It has a bacon thatch roof and the main door is made of pepperoni salami.

This crazy idea has been buzzing in my head after reading about the DON's competition from Nuffnang. It's inspired from the Chocolate Bacon Cupcakes recipe by Helen (Grab Your Fork) and Bacon Baskets recipe by Suze (Chocolatesuze).

Christmas Recipe - Chocolate Bacon
Christmas Recipe - Chocolate Bacon "NOT Gingerbread" Cake House

Let me guide you through the constructions of this fun house:

Method

  1. Bake a chocolate-bacon cake using a 18.5 x 11.5 cm loaf pan. I use the chocolate bacon cupcakes recipe from Grab Your Fork. Adjust the baking time to 40 minutes. Let it cool completely.
  2. Make the maple frosting (Recipe available from HERE) and chocolate frosting (recipe available HERE).
  3. Make the bacon thatch roof. Trim off all rind and fats from the bacon slices (this will prevent shrinkage and will give the roof a nice flat square shape). Cut the bacon into long thin strip (10 cm in length) and weave into a 9 x 9 cm square.
  4. Place the bacon on a sheet of paper towel and cover it with another paper towel. Microwave it for 2-3 minutes or until the bacon is brown and crisp. Make 2.
  5. Cut the cake loaf into two equal size pieces and trim each piece to a 9 x 9 cm square. Further trim one of the squares to a triangle. Spread a layer of chocolate frosting on the top of the square piece of cake and stack the triangle piece on top.
  6. Spread chocolate frosting on all surfaces and attach the bacon roof.
  7. DON's pepperoni salami has the perfect shape and texture to make the rustic main door.
  8. Cut the salami as follow to make a 5 cm tall door.
  9. Attach the salami door to the wall that is covered with chocolate frosting. Pipe a small dot of maple frosting and attach a silver cachous as the door knot. Attach a colourful chocolate candy on top of the salami door to reassemble the Christmas wreath.
  10. I use chocolate coated liquorice to give this house a winter log cabin feel.
  11. Attached the chocolate coated liquorice on all walls that has already been covered with chocolate frosting.
  12. Pipe the maple frosting around the roof to decorate. Add silver cachous on maple frosting for more festive feel.
  13. For the chimney, I use yogurt coated raspberry liquorice.
  14. Slice the liquorice in an angle that will make it sitting well on the roof.
  15. Pipe a little maple frosting on the sliced angle and attach it to the roof.
  16. Pipe a little more maple frosting on the chimney and decorate it with more silver cachous.
  17. Place a skiing Santa figure next to the newly completed ski lodge.

Labels: , , , , , , ,

Black Forest Tiramisu

For the first time in many years we celebrated Christmas without our family. During the past Christmases, we would either visit my parents in Malaysia or Mr J's parents would visit us from Holland to escape the European winter and soaked up the sunshine in the Australian summer.

Our dear friends Miss A and Mr G were in the similar situation. They decided to host the Christmas lunch and invited us over for a feast. I came up with the idea of making this Black Forest Tiramisu for the lunch as both of them lived in Germany for eight years before residing in Sydney.

The Black Forest (Schwarzwald) is a wooded mountain range in Baden-Württemberg, southwestern Germany. It is bordered by the Rhine valley to the west and south. We have visited the area once on our way to Chamonix two years ago.

Black Forest, Germany

Black Forest Tiramisu

This Black Forest version of Tiramisu is inspired by the Black Forest Cake which is originated from this region, and so, by name and reputation at least. It is known as Schwarzwälder Kirschtorte (literally "Black Forest cherry torte") in German and is made with chocolate cake, cream, sour cherries, and Kirsch (cherry brandy).

Black Forest Tiramisu (Serves 8)


Ingredients

  • 1 chocolate sponge cake (Recipe follows)
  • 1 cup strong espresso coffee
  • 2 tbsp Kirsch
  • 2 eggs
  • 75 g caster sugar
  • 250g Mascarpone cheese
  • 300 ml double cream
  • 1 cup cherries, pitted and halved (soaked in 1/2 cup of Kirsch for at least 2 hours or overnight) + more cherries for decorations
  • Grated dark chocolate
  • Shaved dark chocolate for decorations

Method

  1. Mix the espresso coffee with 2 tbsp of Kirsch.
  2. Drain the cherries that have been soaked in the Kirsch for at least 2 hours.
  3. Combine the eggs and caster sugar in an electric mixer and whisk together until thick and light. The mixture should be thick enough to leave a trail on the surface.
  4. Put the Mascarpone cheese into a large bowl. Stir in a little of the egg mixture. Fold in the remaining egg mixture. Fold in the double cream. Stir in the cherries.
  5. Cut the chocolate sponge cake to fit the size of the base of the individual serving glasses or the large serving bowl.
  6. Line the bottom of the glass with a layer of chocolate sponge cake. Drizzle the espresso coffee and kirsch mixture over the chocolate sponge cake.
  7. Sprinkle over a thick layer of grated dark chocolate, then spoon Mascarpone mixture on top (3-4 tbsp, enough to cover the chocolate sponge cake). Level the surface.
  8. Repeat the layers until it reaches the top of glass.
  9. Decorate with the remaining grated dark chocolate. Cover and chill for 4 hours.
  10. Decorate with a few of the whole cherries and shaved dark chocolate before serving.

Chocolate Sponge Cake Recipe

Chocolate Sponge Cake Recipe


Ingredients

  • 75 g (2 1/2 oz) plain flour
  • 2 tbsp cocoa powder
  • 150 g (5 oz) self-raising flour
  • 6 eggs
  • 220 g (7 oz) caster sugar

Method

  1. Preheat the oven to moderate 180C (350F). Lightly grease a rectangular (30 x 20 cm) cake tin and line the bases with baking paper. Dust the tins with a little flour, shaking off any excess.
  2. Sift the flour together three times onto a sheet of greaseproof paper. Beat the eggs in a large bowl with electric beaters for 7 minutes, or until thick and pale. Gradually add the sugar to the egg, beating well after each addition. Using a large metal spoon, quickly and gently fold in the sifted flour and 2 tbsp boiling water.
  3. Spread the mixture into the tin and bake for 25 minutes, or until the sponge shrinks slightly from the sides of the tin. Leave the sponge in their tin for 5 minutes before turning out onto a wire rack to cool.

Note: The secret to making a perfect sponge lies in the folding technique. A beating action, or using a wooden spoon, will cause loss of volume in the egg mixture and result in a flat heavy cake. The sponge cake can be frozen up to one month in freezer bag. Thaw at room temperature for about 20 minutes.

Labels: , , , , , ,

Dutch Oliebollen

Oliebollen (laterally means oil balls) are a Dutch delicacy that are traditionally eaten on New Year's Eve. They are often referred as Dutch Doughnuts / Donuts.

Dutch Oliebollen
Dutch Oliebollen

The dough is made from flour, eggs, yeast, salt, milk and with variations of sultanas, currants, raisins, apples and lemon zest. They are then deep-fried and served with powdered sugar. They are light, taste fruity and less sweet than the traditional American Doughnuts.

Supermarkets in The Netherlands sell the pre-mix Oliebollen packages but they are not easily available in Sydney. I was extremely excited when I saw this Oliebollen recipe from the Snowflakes and Schnapps Cookbook - one of my favourite cookbooks as it contains many of Mr J's favourite European traditional dishes.

The author Jane Lawson has given many of the classics a modern touch. Almost all of the recipes are accompanied with beautiful pictures and the recipes are brilliantly written with clear instructions and details.

Oliebollen (Serves 8)

(Adapted from Jane Lawson's Snowflakes and Schnapps Cookbook)


Ingredients

  • 10 g (1/4 oz) fresh yeast (* I use 5 g dried yeast)
  • 2 tbsp caster (superfine) sugar
  • 125 ml (4 fl oz . 1/s cup) lukewarm full-cream (whole) milk
  • 190 g (6 3/4 oz / 1 1/4 cups) plain (all-purpose_ flour
  • A large pinch sea salt
  • 1 tbsp rum (optional)
  • 1 small egg
  • 1 1/2 tbsp raisins, chopped (I used 2 tbsp currants)
  • 1 granny smith apple, peeled, cored and finely chopped
  • 1/2 tsp finely grated lemon zest
  • sunflower oil, for deep-frying
  • icing (confectioner's) sugar, for dusting

Method

  1. Break up the fresh yeast then mash together with 1 tsp of the sugar and 60 ml (2 fl oz / 1/4 cup) of the warm milk until smooth. Set aside in a warm place for 15 minutes or until frothy.
  2. Sift the flour, sea salt and remaining sugar into a bowl and make a well in the centre. Pour in the warm milk, rum (if using), yeast mixture and the egg and mix to combine well.
  3. Stir in the raisins, apple and lemon zest combining well. Cover and rest in a warm place (I left it on the cup-warming section of our espresso machine) until doubled in size - this will take about an hour or so.
  4. Bang the bowl a couple of times on the work surface to knock out some of the air.
  5. Fill a deep-fryer or large heavy-based saucepan one-third full with oil and heat to 180C (350F), or until a cube of bread dropped into the oil browns in 15 seconds.
  6. Using two spoons, carefully drop rounded tablespoons of the mixture into the oil, using one spoon to push the mixture off the other, and cook for about 6 minutes, or until puffed and golden and cooked all the way through.
  7. Drain on paper towels.

Labels: , , , ,

Chocolate Chai Macarons with Bailey's Irish Cream

Oh no, it's macarons again. Oh yes, but how can you resist the beauty of these macarons.

Chocolate Chai Macarons with Bailey's Irish Cream

Chocolate Chai Macarons with Bailey's Irish Cream Recipe

Makes about 16 filled macarons


Ingredients

  • 1 cup confectioners’ sugar
  • 3/4 cup ground almonds
  • 1/4 cup Chocolate Chai
  • 6 tbsp of egg whites (I use 3 egg whites, 55g each)
  • Pinch of salt
  • 1/4 cup granulated sugar

Bailey's Irish Cream Buttercream:

  • 2 sticks of unsalted butter at room temperature
  • 2 lbs confectioner's sugar (more or less)
  • 2 tsp Bailey's Irish Cream

Method

  1. To Make Baily's Irish Cream Buttercream: Cream butter, sugar and Beiley's Irish Cream together. Use or keep chilled for up to 2 weeks.
  2. Grind ground almond, Chocolate Chai powder and icing sugar with food processor to make sure there’s no lumps.
  3. Whip the eggs whites with a pinch of salt and slowly adding in the granulated sugar until soft peaks formed. Add the dry ingredients to the egg whites half at a time and start folding.
  4. You should get a slow moving batter (flow-like-magma consistency).
  5. Pipe the macaron batter onto baking paper.
  6. Bake at 320F (160C) for 12 mins.
  7. Let cool.
  8. Fill the macaron shells with Bailey's Irish Cream Buttercream.

Labels: , , , , ,

Chocolate Custard Tarts

From day one after I have purchased the Bills Open Kitchen Cookbook, I was drawn to these rusty looking Chocolate Custard Tarts. They are very similar to the Portuguese Custard Tarts but the dark chocolate has added richness and depth of flavour to the tarts.

Chocolate Custard Tarts

These tarts are best eaten while they are still hot and fresh from the oven. It's like biting into a light buttery flaky pastry topped with warm chocolate mousse!

Chocolate Custard Tarts (Makes 18)

(Adapted from Bill Granger's Bills Open Kitchen)


Ingredients

  • 3 egg yolks
  • 55 g (1/4 cup) caster (superfine) sugar
  • 2 tbsp cornflour (cornstarch)
  • 1 tsp natural vanilla extract
  • 185 ml (3/4 cup) cream
  • 150 g (1 cup) dark chocolate, grated
  • 2 sheets puff pastry
  • icing (confectioners') sugar, for dusting

Method

  1. Preheat the oven to 220C (425F/Gas 7). Place the egg yolks, sugar, cornflour and vanilla into a bowl and whisk until smooth. Add the cream and 125 ml (1/2 cup) water and whisk again. Pour into a saucepan and place over a medium heat. Stir until the mixture is thick, about 5 minutes. Remove from the heat, add the chocolate and stir until melted. Leave to cool.
  2. Place the sheets of puff pastry on top of each other and roll up. Cut into 1 cm (1/2 inch) wide slices and roll out into rounds 10 cm (4 inches) and diameter. Lightly grease a non-stick 6-hole and a 12-hole 125 ml (1/2 cup) muffin tin and push each round into the individual holes. Place in the freezer and chill for 10 minutes. Remove and divide the custard mixture evenly between the tart shells.
  3. Place in the oven and bake for 20 minutes, or until the pastry is golden. Remove from the oven and leave to cool in the tins for 10 minutes before removing. Dust with icing sugar and serve.

Labels: , , ,

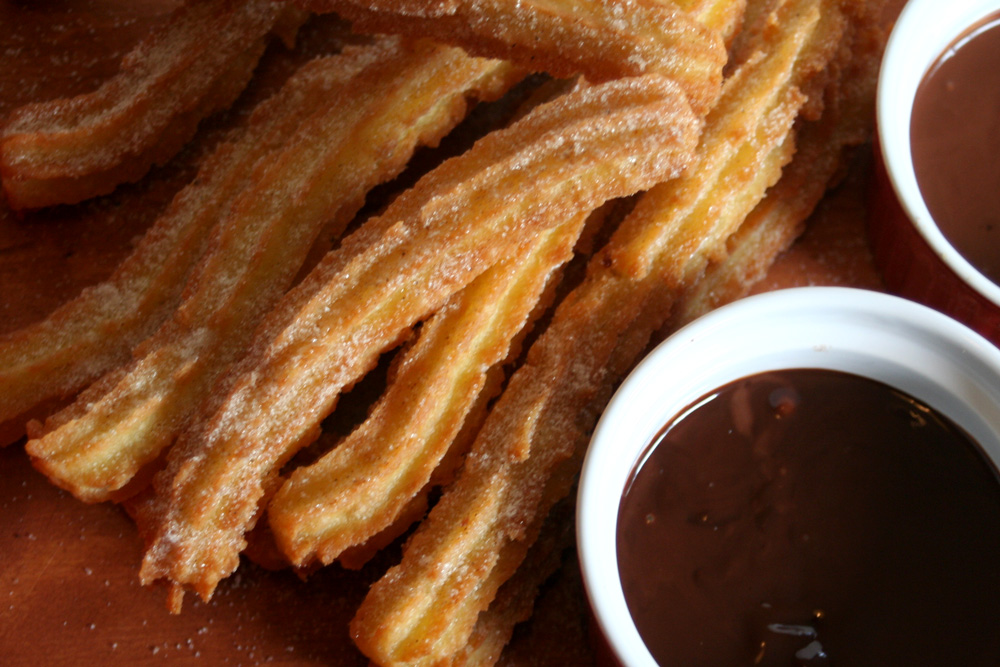
Cinnamon Churros with Real Hot Chocolate

Rick's Stein's "Mediterranean Escapes" is the first cookbook Mr J ever bought for me. He never bought me a cookbook before because I have the expensive habit of buying cookbooks as soon as I "need" them! A nice little Christmas surprise from him, two years ago. He bought this cookbook for me because he genuinely likes the recipes in it. He hoped I would like the recipes and cook some for him.

Cinnamon Churros with Real Hot Chocolate

Yes, I like this cookbook very much indeed. Rick Stein's recipes are always workable, very reliable and the end results are often picture perfect. I have made Sicilian Orange Cake, Greek Style Pot-Roasted Chicken, Kefta Mkaouara (Spicy Egg, Meatball and Tomato Tagine), Blakava and I made this Cinnamon Churros with Real Hot Chocolate today.

Rick Stein has written a nice piece of story to accompany this recipe:

In the mid-sixties I spent about a week in a youth hotel in Seville just by the railway station. I shared a room with a Swedish chap called Jonas. He had the best pair of worn patched Levi's I'd ever seen, brown cowboy boots, a blue striped cotton shirt, a cool beard, a battered leather Gladstone bag and a tobacco pouch. I swear he did his rollies with one hand. He must have been all of 19 at the time. I had not a whisker of a chance with any of the girls in the hostel. Life just ain't fair. And the make matters even worse, as well as being so cool he was also very nice and introduced me to churros with chocolate sauce. You had to be up sort of early for a 19-year old to get the first of the day when the oil was clean and fresh. But I never forgot them, any more than I forgot about him. You don't, do you?

Cinnamon Churros with Real Hot Chocolate Recipe (Serves 4)

(Adapted from Rick Stein's Mediterranean Escapes)


For the Churros:

  • Sunflower oil, for deep-frying
  • 100 g plain flour
  • 150 ml full-cream milk
  • 2 medium eggs, beaten
  • 50 g golden caster sugar
  • 3/4 tsp ground cinnamon

For the Hot Chocolate:

  • 225 g good quality plain chocolate with at least 60% cocoa solids
  • 200 ml full-cream milk

Method

  1. For the churros, heat some oil for deep-frying to 190C and preheat the oven to 150C.
  2. Sift the flour onto a creased sheet of greaseproof paper and set to one side. Bring the milk and 150 ml water to the boil in a pan, take the pan off the heat and add the flour all at once, beating vigorously with a wooden spoon until the mixture forms a thick paste - but don't worry about any small lumps. Leave to cool slightly and then gradually beat in enough of the eggs to make a smooth but still stiff, glossy mixture that drops reluctantly off the wooden spoon. Spoon the mixture into a piping bag fitted with a large star nozzle.
  3. Hold the bag over the hot oil and gently squeeze out a few 10-cm lengths of the mixture. Leave them to fry for 4 minutes, turning them oven halfway through, until crisp and richly golden brown. Lift them out with a slotted spoon onto a baking tray lined with lots of kitchen paper and keep warm in the oven while you cook the remainder.
  4. For the hot chocolate, break the chocolate into a heatproof bowl and rest it over a pan containing about 2.5 cm just-simmering water. Lave until completely melted. Bring the milk to the boil in a small pan. Remove the bowl of chocolate from the heat and whisk in the hot milk. Pour into tall, narrow pots.
  5. Mix the caster sugar and cinnamon together in a shallow dish, add the churros a few at a time, and toss them gently until lightly coated. Pile alongside each pot of hot chocolate and serve while still warm.

Labels: , , , ,

Baklava

Baklava is a rich, sweet pastry featured in many cuisines in the area once controlled by the former Ottoman Empire, in Central Asia and in the lands in between. It and its variants are thus popular in Turkey, the Balkans, Cyprus, much of the Arab world, Iran, the Caucasus, Afghanistan and the lands of the Turkic peoples of Central Asia. It is a pastry made of layers of phyllo dough filled with chopped nuts and sweetened with syrup or honey.

Baklava
Baklava

Rick Stein: "I have already mentioned the impressive furore of activity at Imam Cagdas, the kebab restaurant in Gaziantep, and this was especially so on the first floor where they were making baklava. There must have been 50 or 60 people preparing the paper-thin pastry and the bright green pistachios, building up the trays of baklava and baking them in the huge, wood-fired ovens. But only two people, Burhan Cagdas's ageing father and one other, were allowed to apply the boiling hot syrup after baking, which had to be at just the right temperature and consistency. There was so much flour in the air where the pastries were being assembled that everyone seemed to be working in a dream-like haze. The most distinctive elements, apart from the perfect pastry, were the vibrantly green pistachios, harvested when young, and the butter made from ewe's milk. This is their recipe and is still very good even when made with ordinary butter and pistachios, and is just perfect with a cup of strong black coffee - Turkish, of course."

Baklava Recipe (Makes about 20 pieces)

(Adapted from Rick Stein's Mediterranean Escapes)


Ingredients

  • 500 g filo pastry sheets
  • 150 g clarified butter, warmed (* see note below on how to make clarified butter)
  • 250 g shelled pistachio nuts

For the Pastry Cream:

  • 300 ml milk
  • 40 g Semolina

For the Syrup:

  • 600 g granulated sugar
  • 1 tsp lemon juice

* To make Clarified Butter: Place butter in a small pan and leave it over a very low heat until it has melted. Skim off any scum from the surface and pour off the clear (clarified) butter into a bowl, leaving behind the milky white solids that will have settled on the bottom of the pan. The butter is ready to use.

Method

  1. First make the pastry cream. Put the milk and semolina into a small, non-stick pan and slowly bring to the boil, stirring. Simmer for 1 minute, then transfer the mixture to a bowl, press a sheet of clingfilm onto the surface to prevent it from forming a skin and leave to go cold.
  2. Preheat the oven to 160C. Cut down the filo pastry sheets if necessary so they will line a 20 x 30-cm shallow, rectangular, non-stick baking tin. Brush the base and sides of the tin with some of the clarified butter, then line the base with 15 single layers of pastry, brushing each one lightly with butter before adding the next. Don't butter the last sheet of pastry.
  3. Mix the pastry cream until smooth, loosening it slightly with a little milk if it seems stiff, then spread it evenly over the top of the pastry. Sprinkle over the chopped pistachios in an even layers. Cover the top of the baklava with another 15 layers of filo pastry, lightly brushing with butter between each layer.
  4. Using a larger, very sharp knife, cut the baklava into portion-sized pieces - make 3 evenly spaced cuts lengthways down the tin and then cut across at an angle to make small diamond-shaped pieces (Note: I prefer to cut them into square pieces, less wastage). Drizzle over any remaining butter. Bake the baklava for 1 hour until crisp and richly golden.
  5. Meanwhile, for the sugar syrup, put the sugar and 350 ml water into a pan and leave over a low heat until the sugar has completely dissolved and the mixture is clear. Then bring to the boil and simmer vigorously until it reaches 107-108C, the 'thread' stage - you will need a sugar thermometer to check. Add the lemon juice to the syrup and set aside.
  6. A minute or two before the baklava is ready to come out of the oven, bring the sugar syrup back up to the boil. Remove the baklava from the oven, quickly and carefully run a knife along the cuts to check the pieces are all separated, then immediately pour over the hot syrup. This will look like a large amount, but it will gradually be absorbed by the pastry as it cools. Leave the baklava to go cold, then carefully remove from the tin to serve.

Labels: , , , ,

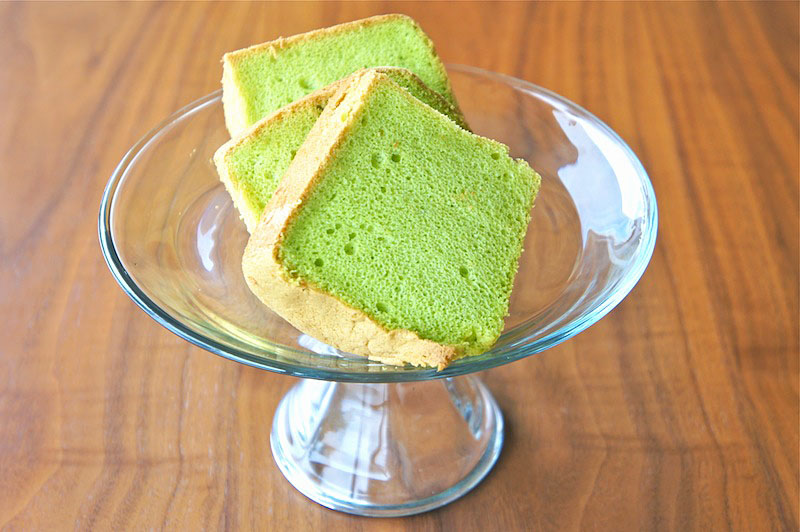
Pandan Chiffon Cake

Do you have a kitchen disaster story? I have a lot. I had a total cooking disaster with this pandan chiffon cake. There were a few of my lucky twitter followers who had witnessed the disaster live on twitter as I was tweeting it away as it happened.

Pandan Chiffon Cake
Pandan Chiffon Cake

Pandan chiffon cake is something very nostalgic to a lot of Malaysians and Singaporeans. We basically grew up with it. We ate so much that sometimes we got sick of it. Now, many years later, I begin to miss it. I miss the smell of the pandan leaves flavour when the cake was baking in the oven. I miss the silky soft texture of the chiffon cake. I miss the shade of green that reminds me of home.

It was a last minute decision. It was a cold rainy evening. I was craving for pandan chiffon cake. I didn't have a chiffon cake pan. I didn't have a proper pandan chiffon cake recipe. I had never baked one before but I had all the ingredients in my pantry to make one.

I flipped to the page of vanilla chiffon cake recipe from an old trusty cookbook and started to look for a suitable cake pan. I thought bundt cake pan should do the trick but this was one of the two mistakes I made that day. It turned out that the bundt cake pan I have was smaller than I thought. Not that much smaller though. The biggest blunder I found out later was that I mistakenly used baking soda instead of cream of tartar. The two boxes were standing side by side in the pantry and I didn't know how and why, I picked the wrong box without realising it.

What happened to the cake as a result of my mistakes?

It kept rising and rising. How I wish I was making a souffle. It would be a mega success :) Nevertheless, the cake turned out to be as good as it should be. The smell of the pandan flavour was as good as my childhood. The texture was good except for some small air pockets caused by the use of baking soda.

** The worst part of the disaster is cleaning up the aftermath. The cake dough overflew from the bundt cake pan. Burnt bits sticked to the wire rack and bottom of the oven. It took me a good couple of hours of scrubbing to get rid of them.

There was nothing one can't do with some clever knife work to give the cake a good trimming. Looking at these pictures, you won't have a clue about the disaster.

Pandan Chiffon Cake (Makes 16 servings)

(Loosely adapted from The Good Housekeeping Step-By-Step Cookbook)


Ingredients

  • 2 1/4 cups cake flour (not self-raising)
  • 1 tbsp baking powder
  • 1 tsp salt
  • 1 1/2 cups granulated sugar
  • 1/2 cup vegetable oil
  • 5 large egg yolks
  • 1 tbsp pandan essence
  • 1 tsp pandan paste
  • 7 large egg whites
  • 1/2 tsp cream of tartar

Method

  1. Preheat oven to 325F. In large bowl, combine flour, baking powder, salt and 1 cup granulated sugar. Make a well in center and add oil, egg yolks, pandan essence, pandan paste, and 3/4 cup cold water; whisk into flour mixture until smooth.
  2. In another large bowl, with mixer at high speed, beat egg whites and cream of tartar until soft peaks form. Beating at high speed, gradually sprinkle in remaining 1/2 cup granulated sugar, 2 tbsp at a time, beating well after each addition, until whites stand in stiff peaks when beaters are lifted. With rubber spatula, gently fold one-third of whites into yolk mixture; fold in remaining whites. Pour batter into ungreased 9- to 10-inch tube pan.
  3. Bake 1 1/4 hours, or until top springs back when lightly touched. Invert cake in pan on funnel or bottle; cool completely in pan. Carefully run metal spatula around side of pan to loosen cake; remove from pan and place on cake plate.

Labels: , , , , ,

WEIS Mango and Cream Ice Cream

WEIS Mango and cream bar has to be little Miss C favourite choice of ice cream. After many trials with the aid from my little critical taste tester last summer, I have perfected a recipe found on Not Quite Nigella and I can confidently say it now tastes almost 99.9% similar to the original.

WEIS Mango and Cream Ice Cream

Mango and Cream Ice Cream

(Loosely adapted from Not Quite Nigella)


Ingredients

  • 1 2/3 cup of mango puree (about 4 medium sized mangoes)
  • 2/3 cup of caster sugar
  • 2/3 cup milk
  • 2/3 cup mango juice
  • 2/3 cup thickened cream

Method

  1. Place 1 1 /3 cup of mangoes, milk, caster sugar and mango juice in a blender and whizz until smooth. Stir in cream.
  2. Place in an ice cream maker and churn in an ice-cream machine following manufacturer's directions.
  3. Swirl in the remaining 1/3 cup of mango puree.

Labels: , , ,

Chocolate Fondants

Take a look at this picture. It's a perfect soft centred chocolate fondant sitting pretty in the ramekin. I was too tempted by how pretty it looks through the glass of the oven.

Chocolate Fondants
Chocolate Fondants

I should know better but most of the time we are weak when faced with such rich, dark and handsome looking chocolaty thing.

Chocolate Fondants

(Adapted from Delicious Magazine)


Ingredients

  • 200 g good-quality chocolate
  • 240 g unsalted butter, diced
  • 4 eggs
  • 90 g caster sugar
  • 30 g plain flour, sifted
  • Icing sugar, to dust

Method

  1. Grease and line 2 baking trays with baking paper. Grease and line the sides of six 4cm-deep, 8cm metal rings with baking paper and place them on the trays. You can also use sex 3/4 cup (185 ml) souffle dishes that have been greased and lightly dusted with flour (shake off any excess flour).
  2. Chop the chocolate. Put chocolate and butter in a heatproof bowl set over a pan of simmering water (don't let the bowl touch the water) and allow to melt, stirring occasionally, until smooth. Remove from the heat and cool to room temperature.
  3. In a separate bowl, whisk the eggs and sugar together until thick and pale. Fold in chocolate mixture, then fold in flour. Pour into metal rings or souffle dishes and chill for at least 2 hours (this helps fondants maintain their soft centre during cooking).
  4. Preheat the oven to 200C. Bake the fondants for 10-12 minutes until set - they should be cooked on the outside but running in the centre.
  5. Remove from the oven and allow to sit for a moment before turning out. If using metal rings, use a palette knife or spatula to carefully transfer fondants to serving plates, then remove metal ring and baking paper. Fondants cooked in souffle dishes can be served straight from the dish.
  6. Dust with icing sugar and serve immediately with a scoop of ice cream.

Labels: , , ,

Pandan Coconut Macaroons (Gluten-free)

I have changed a few ingredients and cooking steps to make it gluten free and it now has a more KUIH-like texture. I have baked them in mini muffin tray instead of the traditional macaroons shape. I hope you like my adaptation.

Pandan Coconut Macaroons (Gluten-free)

On a last note, these are Coconut Macaroons made of dried shredded coconut, not to be confused with French Macarons.

Pandan Coconut Macaroons

(Loosely adapted from Gourmet Traveller Magazine)


Ingredients

  • 3 eggs
  • 225 g (1 cup) caster sugar
  • 80 g (3/4 cup) rice flour
  • 50 g (1/3 cup) tapioca flour
  • 1 tsp vanilla essence
  • 300 g shredded coconut
  • 60 ml (1/4 cup) pandan juice - Blend three shredded pandan leaves with 60 ml water in a blender until finely pureed, then pass through a fine sieve

Method

  1. Preheat oven to 150C.
  2. Whisk eggs and sugar until dissolved. Sieve over both flour, fold to combine. Add vanilla essence and 1 tsp salt, fold through shredded coconut and pandan juice.
  3. Grease a 12-hole mini muffin tray with oil or butter. Spoon coconut mixture into each hole until full. Bake in oven until golden and cooked through (35 minutes).
  4. Cool slightly, carefully remove macaroons and set aside to cool to room temperature (20-30 minutes).

Labels: , , , , ,

Coconut Christmas Wreaths

You won't believe how easy it is to make these pretty eatable miniature Christmas wreaths. Two ingredients, stir and mix. That's all you need to do!

Coconut Christmas Wreaths

You can turn them into beautiful Christmas decorations, gifts, and gift tags.

Coconut Christmas Wreaths Recipe


Ingredients

  • 180 g white eating chocolate, melted
  • 1 1/4 cups (95 g) shredded coconut
  • Cachous

Method

  1. Line two trays with baking paper.
  2. Combine chocolate and coconut in medium bowl. Drop heaped tablespoons of mixture onto trays; shape mixture into wreaths using the end of a wooden spoon to make holes in the centre of each wreath.
  3. Decorate wreaths with cachous. Refrigerate until set. Tie with ribbon, if you like.

Labels: , , ,

Belinda Jeffery's Flourless Chocolate, Pecan and Raspberry Torte

I love this cake. It fills all the criteria for a wonderful holiday dessert. It's rich and sophisticated, keep exceptionally well, is very simple to make and, all-important for a special occasion, look spectacular. The iced cake, minus the raspberries, keeps well in the freezer for up to a month.

Belinda Jeffery's Flourless Chocolate, Pecan and Raspberry Torte

Belinda Jeffery's Flourless Chocolate, Pecan and Raspberry Torte Recipe

(Adapted from AWW Christmas and Holiday Entertaining Cookbook)


Ingredients

  • 250 g unsalted butter
  • 250 g good quality dark chocolate
  • 3/4 cup (75 g) sifted Dutch processed cocoa powder
  • 1 2/3 cup (200 g) roasted pecans
  • 6 eggs
  • 1 1/2 cups (330 g) caster sugar
  • 1/3 cup (80 ml) brandy or cognac
  • 2 tsp vanilla extract
  • 2-3 punnets raspberries
  • double thick cream, for serving

Chocolate Glace:

  • 250 g good quality dark chocolate, chunks
  • 125 g unsalted butter, chopped
  • 2 1/2 tbsp water

Method

  1. Preheat oven to 180C. Butter a 23 cm springform cake pan and line the base with buttered baking paper. Dust cake pan with flour or rice flour (if you're avoiding wheat) and tap out the excess. Set it aside.
  2. Melt the butter in a medium-sized saucepan over low heat. Add the chocolate and whisk until melted. Take the pan off the heat, then add the cocoa, stirring it in until the mixture is thick and smooth. Set it aside to cool a little.
  3. Meanwhile, whiz the pecans in a food processor to chop them as finely as possible. Stop the machine every so often to check them so they don't become oily and form a paste. Set them aside.
  4. In a large bowl, whisk eggs and sugar with a balloon whisk until they are just blended together, then whisk in the warm chocolate mixture until it's well combined. Mix in the brandy and vanilla. Finally, stir in the ground pecans - the batter will look very loose and sloppy, but don't worry, it's fine.
  5. Pour the batter into the prepared pan. Bake the torte for 40-45 minutes or until the side is set, but the middle 15 cm or so of the torte is still a bit wobbly when you gently shake the pan.
  6. Cool the torte completely in the pan on a wire rack. Once cool, release the sides of the pan and carefully invert the torte onto the rack. Remove the paper.
  7. Chocolate Glaze: Put the chocolate, butter and water into a medium-sized, heavy based saucepan over low heat. Let the chocolate and butter melt, stirring regularly, until they are smooth. (A small, flat sauce whisk is ideal for this, as it gets right into the corners of the pan where the chocolate tends to clump a bit.) The most important thing to keep in mind when you're making the glaze is that it mustn't get too hot and boil; If it does, it becomes oily and grainy and there's not much chance of salvaging it. Once it's silky smooth, take it off the heat. Let it cool until it's barely warm and a thick pouring consistency before using it.
  8. To ice, place the torte on the rack over a plate to catch any drips, then pour a good amount of the barely warm Chocolate Glaze into the middle of the torte. Tilt the rack so the glaze flows evenly over the top and runs down the sides (for the smoothest finish, don't run a palette knife over it). If your room is cool, you can leave the glaze to set at room temperature. However, where I live, summer is hot and humid, so I generally transfer the lot - the torte on its rack on the drip plate - into the fridge to set. Once set, slide the torte onto a serving plate and cover it in plastic wrap - it will keep well like this for at least a week. Before serving, remove the wrap and return the torte to cool room temperature.
  9. To finish off, sit a tightly packed layer of raspberries all over the top, then dust them very lightly with icing sugar. Serve with cream.

Labels: , , , , , , ,

Gateau Breton (Brittany Butter Cake) - or is it Boterkoek (Dutch Butter Cake)?

May be I was wrong. May be this Gateau Breton really does taste like the Dutch Boterkoek. I guess my hope of finding out the answer relies on the Dutch readers.

On a side note, this is a very good recipe to use up all your egg yolks leftover from making the French Macarons.

Gateau Breton (Brittany Butter Cake)

Nigella Lawson, "I came across the recipe for Brittany butter cake in the wonderful Anne Willan's Real Food, and as she says, it's really a cross between shortbread and pound cake. Rather like the crostata on page 105 (Nigella Lawson's HTBADG Cookbook), it's hard to decided whether it's cake or pastry. I love a stubby slice of this any time, but it does make a perfect, chic ending to a dinner party, too, either with ice cream or fruit, or if you've already had cheese, just with the coffee that follows.

Anne Willan suggests a kneading motion to bring this very sticky dough into shape; I use the dough hook on my free-standing mixer.

Use the best butter that you can find, for this is the plain cake at its simple best, and the taste of each of these few ingredients is crucial."

Gateau Breton (Brittany Butter Cake) Recipe (Serves 8-10)

(Adapted from Nigella Lawson's How To Be A Domestic Goddess)


Ingredients

  • 225 g plan flour, preferably Italian 00
  • 250 g caster sugar
  • 250 g unsalted butter, cut into cubes
  • 6 large egg yolks
  • 25-cm Springform tin, buttered well

For the glaze:

  • 1 tsp of egg yolk, from your 6
  • 1 tbsp of water

Method

  1. Preheat the oven to 190C. Mix the glaze, and put aside while you get on with your gateau.
  2. Put the flour into a bowl (I never bother to sieve 00 flour because it's so finely milled, but if you're using regular plain flour then do so), stir in the sugar and add the butter and egg yolks.
  3. With the dough-hook attachment of a mixer, slowly whirr till you've got a smooth, golden dough. (If you're making this by hand, make a mound of the flour on a worktop, then make a well in it and add the sugar, butter and eggs and knead to mix.) Scoop this dough into the tin, and smooth the top with a floured hand: expect it to be very sticky; indeed, it should be.
  4. Brush the gateau with the glaze, and mark a lattice design on top with the prongs of a fork. For a reason I am not technically proficient enough to explain, sometimes the tine marks leave a firm, striated imprint (a bit like the scrapy lines that drive Gergory Peck mad in Spellbound); at others, as with the cake in the picture in the HTBTDG book, they barely show once the cake's cooked. Bake for 15 minutes, then turn the oven down to 180C and give it another 25 minutes or so until it's golden on top and firm to the touch.
  5. Let it cool completely in the tin before unmoulding it. It'll keep well if you've got a reliably airtight tin. When you come to eat it, either cut it in traditional - though slightly narrower - cake-like wedges or, as I prefer if I'm eating it at the end of dinner, criss-cross, making irregularly sized diamonds.

Labels: , , , ,

Christmas Coconut Ice / Candies with Pandan and Rose Syrup

It all started with a comment from my reader kat of Suum Cuique: "Do you also know how to make coconut candy? Those colorful cubes that we used to sell in school during canteen days. I think it contains condensed milk."

Christmas Coconut Ice / Candies with Pandan and Rose Syrup

Coconut ice is a no-cook classic that's extremely easy to make. All it takes is a little mixing and an hour in the fridge.

Christmas Coconut Ice (Coconut Candies) with Pandan and Rose Syrup Recipe

Makes 40 pieces


Ingredients

  • 395 g can condensed milk
  • 3 1/3 cups (300 g) desiccated coconut
  • 2 cups (330 g) icing sugar
  • 1/ 2 tsp vanilla extract
  • 2 drops pandan paste (or green food colouring)
  • 1 tsp rose syrup (or red food colouring)

Method

  1. Grease an 18 x 28cm lamington pan and line with baking paper, leaving some overhanging on the sides.
  2. Place the condense milk, coconut, icing sugar and vanilla extract in a bowl and mix with a metal spoon until well combined (it will be quite stiff). Divide the mixture into half and place them into 2 separate bowls.
  3. Add rose syrup to first half of the mixture and stir well to combine. Spoon the mixture into the pan and flatten the top using damp fingers.
  4. Add pandan paste to the remaining mixture and stir well to combine. Spoon the mixture over the top of the red layer and flatten the top with damp fingers.
  5. Loosely cover with plastic wrap and chill for 1 hour to set.
  6. Invert the coconut ice onto a board and peel off the baking paper. Cut into 5 strips lengthways, then 8 strips widthways to make 40 squares.
  7. Pack the coconut ice into jars or wrap in cellophane to give as gifts - it will keep in the fridge for 3 weeks.

Labels: , , , , ,

Marmalade and Whisky Ice Cream

Feeling bored with the usual pancakes with maple syrup? If you run out of ideas for pancakes, try topping them with your choice of fresh or poached fruits and a scoop of the marmalade and whisky ice cream. Drizzle with more warmed marmalade and serve with freshly brewed coffee. A perfect start to a weekend morning!

Marmalade and Whisky Ice Cream

Marmalade and Whisky Ice Cream Recipe (Makes 400ml)

(Adapted from Delicious Magazine April 2008)


Ingredients

  • 1/3 cup (115 g) orange marmalade
  • 150 g creme fraiche
  • 250 ml thick Greek-style yoghurt
  • 1 tbsp whisky (optional)

Method

  • Place the marmalade, creme fraiche, yoghurt and whisky, if using, in a bowl. Beat with a wooden spoon to combine, then churn in an ice-cream machine following manufacturer's directions.

Labels: , , , , ,

Matcha (Japanese Green Tea) Macarons

Here is my matcha macaron recipe but I won't publish the ganache recipe here until I have perfected it:

Matcha (Japanese Green Tea) Macarons

Matcha (Japanese Green Tea) Macarons Recipe

(Adapted from Muffinsareuglycupcakes)


Ingredients

  • 1 cup confectioners’ sugar
  • 3/4 cup ground almonds
  • 1/4 cup matcha (Japanese green tea) powder
  • 3 egg whites
  • Pinch of salt
  • 1/4 cup granulated sugar

Method

  1. Grind ground almond, matcha powder and icing sugar with food processor to make sure there’s no lumps.
  2. Whip the eggs whites with a pinch of salt and slowly adding in the granulated sugar until soft peaks formed. Add the dry ingredients to the egg whites half at a time and start folding.
  3. You should get a slow moving batter (flow-like-magma consistency).
  4. Pipe the macaron batter onto baking paper.
  5. Bake at 320F (160C) for 12 mins.
  6. Let cool.

Labels: , , , ,